Nothing is more frustrating than capturing what looks like the perfect moment, only to discover later that the image is blurry because your hands moved during the shot.
If you’ve searched for how to fix shaky hands photography, you’re not alone. Camera shake is one of the most common reasons photos lose sharpness, whether you’re using a DSLR, mirrorless camera, compact camera, or smartphone.
The good news? You don’t need perfectly steady hands to take crystal-clear photos.
Professional photographers rely on techniques, camera settings, stabilization tools, and smart shooting habits not naturally motionless hands. Even photographers with hand tremors consistently produce tack-sharp images.
This guide explains everything you need to know about reducing camera shake, improving stability, choosing the right settings, and capturing sharper images in virtually any situation.
Why Do Shaky Hands Cause Blurry Photos?
Before fixing the problem, it’s important to understand what’s happening.
When the shutter opens, your camera records light for a specific amount of time. If the camera moves during that exposure even slightly the image becomes blurred.
Camera shake usually becomes noticeable when:
- Using slow shutter speeds
- Shooting in low light
- Using long telephoto lenses
- Zooming in significantly
- Photographing one-handed
- Feeling tired or stressed
- Drinking excessive caffeine
- Shooting in windy conditions
The longer your shutter remains open, the greater the chance of movement affecting sharpness.
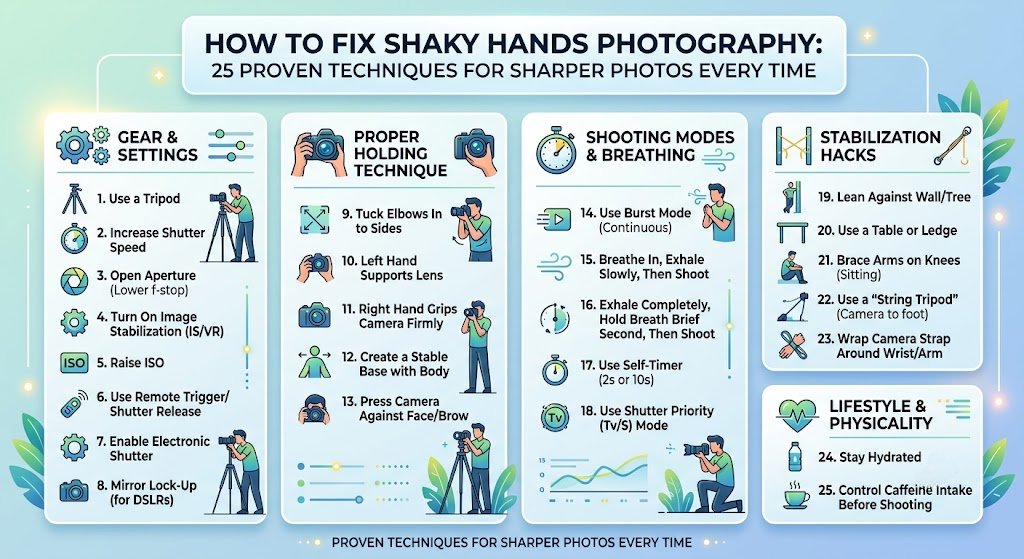
How to Fix Shaky Hands Photography Quickly
If you’re looking for a quick answer, these are the most effective solutions:
- Increase shutter speed
- Turn on image stabilization
- Hold your camera correctly
- Lean against a solid object
- Use both hands
- Control your breathing
- Raise ISO when needed
- Use a tripod or monopod
- Shoot multiple frames
- Use burst mode
These simple adjustments solve most camera shake issues immediately.
Master Proper Camera Holding Technique
Many photographers unknowingly hold their camera incorrectly.
A stable grip dramatically improves image sharpness.
Correct Hand Position
- Right hand grips the camera body firmly
- Left hand supports the lens from underneath
- Elbows stay tucked close to your body
- Keep the camera close to your face
- Stand with feet shoulder-width apart
Instead of holding the camera away from your body, create three points of contact:
- Left hand
- Right hand
- Face pressed lightly against the viewfinder
This creates a much more stable shooting platform.
Improve Your Body Position
Your body works like a natural tripod.
The stronger your stance, the less camera movement you’ll create.
Best Standing Position
- Feet shoulder-width apart
- One foot slightly forward
- Knees slightly bent
- Relax shoulders
- Lean forward slightly
Avoid locking your knees or stretching your arms straight out.
Learn Proper Breathing Control
Competitive shooters and photographers use breathing techniques to minimize movement.
Here’s a simple method:
- Take a slow breath.
- Exhale halfway.
- Hold briefly.
- Press the shutter gently.
- Continue breathing normally afterward.
Avoid taking photos while inhaling deeply, as your chest movement transfers directly to the camera.
Use Faster Shutter Speeds
One of the biggest solutions for how to fix shaky hands photography is increasing shutter speed.
General recommendations:
| Lens Focal Length | Minimum Shutter Speed |
| 24mm | 1/30 sec |
| 35mm | 1/40 sec |
| 50mm | 1/60 sec |
| 85mm | 1/100 sec |
| 135mm | 1/160 sec |
| 200mm | 1/250 sec |
| 400mm | 1/500 sec |
A common rule is:
Minimum shutter speed = 1 ÷ focal length
For high-resolution cameras, use even faster speeds.
Increase ISO Instead of Slowing the Shutter
Many beginners hesitate to raise ISO because they fear image noise.
However, a slightly noisy image is usually much better than a blurry one.
Modern cameras handle ISO surprisingly well.
Typical starting points:
- Bright sunlight: ISO 100
- Cloudy: ISO 200–400
- Indoors: ISO 800–1600
- Night: ISO 1600–6400
Don’t be afraid to increase ISO if it allows a faster shutter speed.
Open Your Aperture
A wider aperture lets more light enter the camera.
Examples include:
- f/1.4
- f/1.8
- f/2
- f/2.8
More light means:
- Faster shutter speeds
- Less camera shake
- Better low-light performance
The trade-off is a shallower depth of field, so ensure your subject remains in focus.
Turn On Image Stabilization
Most modern cameras and lenses include stabilization technology.
Names vary by manufacturer:
- Optical Image Stabilization (OIS)
- Vibration Reduction (VR)
- Image Stabilization (IS)
- SteadyShot
- Sensor-shift stabilization (IBIS)
Stabilization can often provide a 3–8 stop advantage, allowing you to shoot handheld at much slower shutter speeds.
Remember to turn stabilization off when using a tripod unless your equipment specifically supports tripod detection.
Use Burst Mode
Instead of taking one photo, capture five to ten.
Tiny movements vary between frames.
Often, one image in the sequence will be noticeably sharper than the others.
This is especially effective when photographing:
- Wildlife
- Children
- Sports
- Events
- Street photography
Press the Shutter Gently
Many photographers introduce blur by stabbing the shutter button.
Instead:
- Apply gentle pressure
- Squeeze slowly
- Avoid sudden movements
Think of it like pressing a piano key rather than pushing a doorbell.
Use the Camera Timer
Even pressing the shutter can create vibration.
Use:
- 2-second timer
- 5-second timer
- Remote shutter release
- Smartphone camera app
- Wireless remote
Landscape photographers use this technique constantly.
Lean Against Stable Objects
If you don’t have a tripod, use your surroundings.
Examples include:
- Trees
- Walls
- Poles
- Cars
- Tables
- Railings
Even light support significantly improves stability.
Sit or Kneel
Standing creates natural body sway.
Whenever possible:
- Sit down
- Kneel
- Rest elbows on knees
This creates an incredibly stable shooting position.
Use a Monopod
A monopod is lighter than a tripod while providing substantial stability.
Ideal for:
- Wildlife
- Sports
- Bird photography
- Airshows
- Long telephoto lenses
Many professionals rely on monopods for mobility and support.
Invest in a Quality Tripod
A tripod remains the best solution for eliminating camera shake.
Perfect for:
- Landscapes
- Night photography
- Long exposures
- Macro photography
- Product photography
- Architecture
Avoid extremely cheap tripods that flex in the wind.
Add Weight to Your Camera
A heavier setup often reduces tiny vibrations.
Options include:
- Battery grips
- Larger lenses
- Camera cages
- Weighted tripod hooks
Balance is key—don’t add so much weight that fatigue increases over time.
Enable Electronic Shutter
Mechanical shutters can create small vibrations.
Many mirrorless cameras offer:
- Electronic shutter
- Silent shutter
- Electronic first curtain shutter
These modes reduce internal camera movement and are especially useful for macro and telephoto photography.
Improve Your Physical Stability
Photography involves more physical control than many people realize.
Exercises that help include:
- Forearm strengthening
- Grip training
- Yoga
- Stretching
- Balance exercises
Even moderate improvements in muscle endurance can reduce camera shake during long shooting sessions.
Reduce Caffeine Before Important Shoots
Caffeine affects everyone differently.
If you’re particularly sensitive, large amounts before a shoot may increase hand tremors.
Stay hydrated and eat balanced meals to maintain steady energy levels.
Choose Lighter Equipment
Heavy cameras become harder to hold steadily over extended periods.
If fatigue is causing shaky hands:
- Use lighter lenses
- Switch to mirrorless gear
- Carry only necessary equipment
- Take regular breaks
Comfort often translates directly into sharper images.
Understand Lens Choice
Longer lenses magnify even the slightest movement.
For example:
- 24mm hides small shakes.
- 400mm exaggerates every vibration.
When using telephoto lenses:
- Increase shutter speed
- Use stabilization
- Support the lens with your left hand
- Consider a monopod
Smartphone Tips for Reducing Camera Shake
Smartphone cameras have improved dramatically, but they still benefit from proper technique.
Try these tips:
- Hold with both hands
- Rest elbows against your body
- Use Night Mode carefully
- Tap to focus before shooting
- Use burst mode
- Enable stabilization
- Lean against solid objects
Small changes make a noticeable difference.
Camera Settings That Help Prevent Blur
For handheld photography, these settings provide a strong starting point.
Outdoors
- ISO 100–200
- Aperture f/5.6
- Shutter 1/250 sec or faster
Indoors
- ISO 800–1600
- Aperture f/2.8
- Shutter 1/125 sec
Sports
- ISO Auto
- Shutter 1/1000 sec
- Continuous autofocus
- Burst mode
Wildlife
- 1/1000 sec or faster
- Continuous AF
- Stabilization enabled
- Burst shooting
Common Mistakes That Cause Camera Shake
Avoid these frequent errors:
- Holding the camera one-handed
- Using extremely slow shutter speeds
- Forgetting image stabilization
- Standing awkwardly
- Pressing the shutter too hard
- Zooming excessively
- Shooting while walking
- Using telephoto lenses without support
Correcting even one of these habits can noticeably improve image sharpness.
When Shaky Hands May Be a Medical Issue
Occasional hand shake is completely normal, especially after exercise, stress, fatigue, or caffeine.
However, if you experience persistent or worsening tremors that affect daily activities not just photography it is a good idea to consult a healthcare professional. Conditions such as essential tremor, medication side effects, or neurological disorders can contribute to hand shaking.
If you have a diagnosed tremor, adaptive photography techniques like image stabilization, tripods, remote shutters, and faster shutter speeds can still help you produce excellent photographs.
Conclusion
Learning how to fix shaky hands photography isn’t about having naturally steady hands it’s about building reliable habits and using the right tools.
Start with the fundamentals: improve your grip, stabilize your stance, control your breathing, and use faster shutter speeds. Then take advantage of modern camera features like image stabilization, burst mode, and electronic shutters. When conditions demand it, don’t hesitate to use a tripod or monopod.
The biggest improvement comes from combining several techniques rather than relying on just one. With consistent practice, you’ll spend less time deleting blurry images and more time capturing crisp, professional-looking photographs regardless of whether you’re shooting portraits, wildlife, travel scenes, or everyday moments.
Frequently Asked Questions
Why are my photos blurry even with autofocus?
Autofocus only ensures the subject is in focus. If the camera moves while the shutter is open, the image can still become blurry due to camera shake.
Does image stabilization completely eliminate shaky hands?
No. Image stabilization significantly reduces camera movement, but it cannot compensate for severe shaking or subject movement. Good technique is still essential.
What shutter speed prevents camera shake?
A good rule is to use a shutter speed at least as fast as the reciprocal of your lens’s focal length. Faster speeds are often needed for high-resolution cameras or long telephoto lenses.
Can smartphones reduce shaky hands?
Yes. Modern smartphones use optical and electronic stabilization, and combining these features with a proper grip, burst mode, and good lighting can produce remarkably sharp images.
Is a tripod always necessary?
No. Many situations can be handled handheld with proper settings and technique. However, for long exposures, night photography, macro work, or landscapes, a tripod provides the greatest stability.
Does a heavier camera reduce shake?
Sometimes. Extra weight can dampen small vibrations, but if the equipment becomes tiring to hold, fatigue may increase shaking. Choose a balanced setup that you can comfortably support.